Difference between revisions of "Modding site activities"
| (7 intermediate revisions by the same user not shown) | |||
| Line 1: | Line 1: | ||
This page walks through the process of creating an encounter which appears at a site, such as a treasure map or a request for help | This page walks through the process of creating an encounter which appears at a site, such as a treasure map or a request for help. The focus is on getting something simple which you can see in the game, and adding more details later. This guide assumes you have completed some of the earlier guides and does not define all the clicks for each step. The description and screenshots are current as of January 2020, early access version 0.12+104 Pixle Masterson. | ||
== | ==Seeing the effect in game== | ||
This guide is set up in the opposite order to previous guides in this section. It will be easier to understand what the mod does, after you see what it looks like. | |||
<ol> | |||
# | <li>Download and install the mod, "Oh No A Dragon" from steam: https://steamcommunity.com/sharedfiles/filedetails/?id=1925402595 | ||
<li>In developer mode, start a new game, select "one chapter", enable this mod. Enable the pick events cheat and objectives cheat. For this testing I usually also select "Skip progression" and "skip gear" to reduce the number of clicks needed to get to the interesting part. | |||
<li>Use objectives cheat to finish the initial battle. | |||
<li>Scout the nearest adjacent overland tile. If it is a wilderness scouting event, pick one and go through it, then scout another tile so that you have an assault event (red sword icon). | |||
<li>Perform the assault, and choose the event "Treasure map", which should be first or second on the list. If you don't see this event, check that you installed and enabled the mod. | |||
<li>The comic panel has a dialog line which names the nearby tile, where the treasure map leads. You don't need to note it down, but observe that it is there. Finish the encounter. | |||
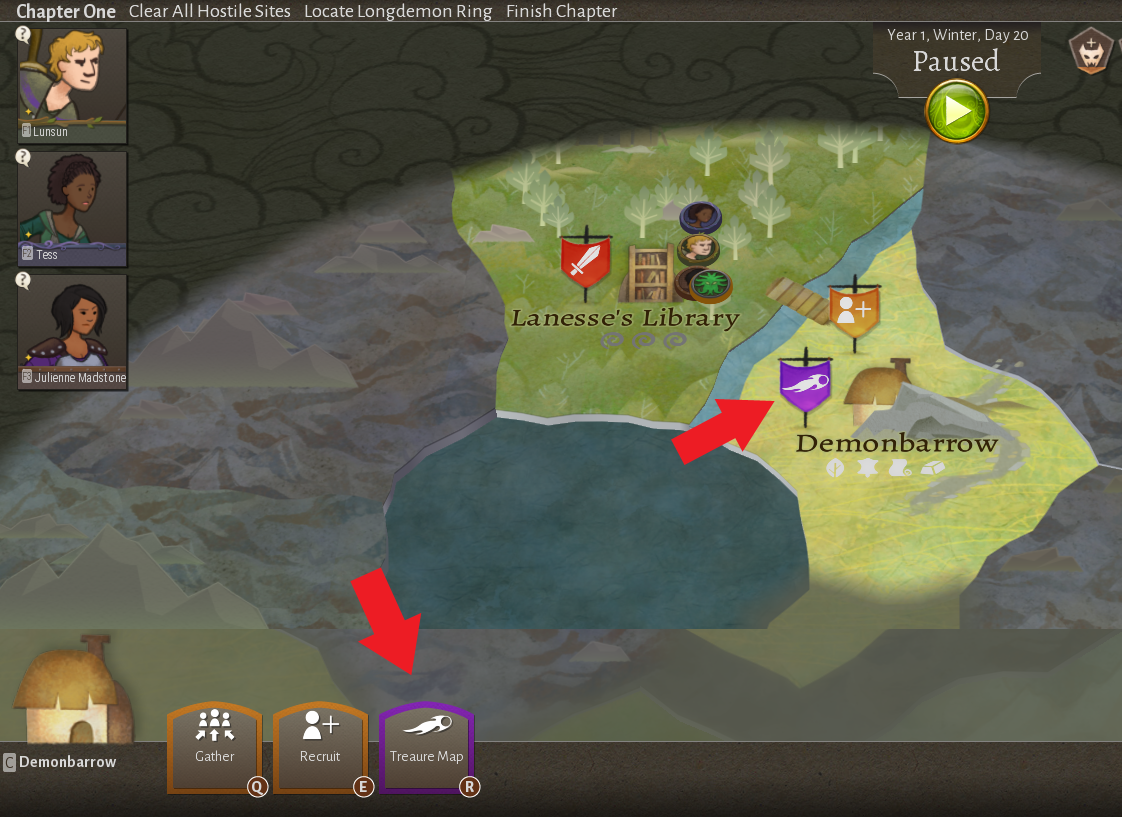
<li>On the overland map, you should now see a purple flag, in the overland tile which was named by the comic panel. This tile is "usually" a scouted tile but not necessarily. | |||
<li>If you click on the site icon (the hut in this case), rather than the overland tile background, you will also see a purple treasure map button, as shown here. | |||
[[File:ModdingMapOverland.PNG]] | |||
<li>Click the button or the flag, to get the popup where you assign participants to the job, as shown here. | |||
[[File:ModdingMapParticipants.PNG]] | |||
<li>The progress bar on the flag should move quickly, and then the dialog "Treasure Map" should appear. | |||
<li>Click through this encounter. | |||
</ol> | |||
The key points of this are: a starting encounter which puts up the flag; the flag, button and dialog for the job; and the encounter itself. | |||
==The starting encounter== | |||
This section describes the key parts of the starting encounter, which puts up the flag. Using the in-game editor, open the comic davea_map_start. This is simple, but you can see the comic dialog reference to <otherSite.name>. Now open the effect. For a reason this author doesn't understand, this method currently only works for arriving at a hostile site, and does not work for either mission victory or wilderness scouting. | |||
The first key part is the targets section, shown below. Target #3 defines the current site, which is generic. Target #6 controls the party members for the encounter, as described in earlier guides; you must have one named role in order for site selection to work, but you will presumably have several anyway. There are two magic parts: target #7, otherSite; and outcome #2, Aspects(otherSite). The magic happens because this target picks nearby site by some rules, and attaching the aspect causes the flag+button to appear on the site. | |||
[[File:ModdingMapTargets.PNG]] | |||
This shows the detail of the target (screenshot edited to remove uninteresting fields). We are picking one random site called otherSite, which must be of type SITE and must not be the current site. The canPath section uses one of your roles (target #6) to make sure that there is a path from this role to this site; this prevents selecting a site which is inaccessible due to impassible mountains or rivers. '''Make sure the role in canPath matches one of the roles in your target''', otherwise this will silently fail. | |||
[[File:ModdingMapSite.png]] | |||
==Adding the aspect== | |||
The aspect is attached by the starting encounter to the otherSite. When the game attaches the aspect, it performs the effect listed in the aspect. In this case, that starts the "job" or treasure map encounter, which makes the flag and button appear. Make sure that the aspect name given in the encounter matches the name of the aspect, and make sure that the effect name given in the aspect matches the name of the encounter. If either of these pairs contain a typo or wrong name, the job will silently fail to trigger. | |||
[[File:ModdingMapAspect.PNG]] | |||
==Adding the second encounter== | |||
Using the in-game editor, view the second encounter, davea_map_job. Unfortunately, this author considers most of this file to be "magic words" which work if used properly, but it is not clear which ones are required, or why. Because the encounter has so many fields, it is easier to show the json code. See [[Modding_Guide#Where_to_find_installed_mods|Where to find installed mods]] to locate the file davea_map_job.json on your disk. These two targets appear to rely on hard coded names which are not explained anywhere this author can find. The promptText appears in the dialog where you select the party. | |||
= | <syntaxhighlight lang="json"> | ||
"targets": [ | |||
{ | |||
"template": "SELF_SITE_THIS_JOB_NOT_ACTIVE", | |||
"aspects": [ "THIS_JOB_NOT_ACTIVE", "SELF" ] | |||
}, | |||
{ | |||
"template": "JOB_PARTICIPANT", | |||
"promptText": "Who will search for the X on the map?", | |||
"slots": { "preFill": "noJobOrParty" } | |||
} | |||
], | |||
</syntaxhighlight> | |||
A few other details of the job are specified in the encounter, which are easier to explain. In the below screenshot of the job, the blurb is what appears in the overlap map tooltip when you hover over the flag. The longName is used for the text of the button. The icon ("magic") is used to select the icon that appears in the flag and the button. As of this writing, it is not possible for modders to add icons; but you can find existing icons and use one of them. The category ("research") is used to select the color of the flag and button. Research is purple, crafting is blue, and site is orange. I don't think modders can control the colors either but probably it is better to use these standard colors. | |||
[[File:ModdingMapAbility.PNG]] | |||
[[File: | |||
== | ==Putting it together== | ||
The best way to create your own encounter like this is to copy the two files for the encounter out of this mod and into your own. Then edit them, either using a text editor on the json, or with the in-game editor. Don't forget to create the aspect, and make sure all the names are matching. Then follow the instructions at the start of this guide to see your encounter in game. | |||
[[Category:Modding]] | [[Category:Modding]] | ||
[[Category:Modding Guides]] | [[Category:Modding Guides]] | ||
Latest revision as of 09:56, 11 January 2020
This page walks through the process of creating an encounter which appears at a site, such as a treasure map or a request for help. The focus is on getting something simple which you can see in the game, and adding more details later. This guide assumes you have completed some of the earlier guides and does not define all the clicks for each step. The description and screenshots are current as of January 2020, early access version 0.12+104 Pixle Masterson.
Seeing the effect in game
This guide is set up in the opposite order to previous guides in this section. It will be easier to understand what the mod does, after you see what it looks like.
- Download and install the mod, "Oh No A Dragon" from steam: https://steamcommunity.com/sharedfiles/filedetails/?id=1925402595
- In developer mode, start a new game, select "one chapter", enable this mod. Enable the pick events cheat and objectives cheat. For this testing I usually also select "Skip progression" and "skip gear" to reduce the number of clicks needed to get to the interesting part.
- Use objectives cheat to finish the initial battle.
- Scout the nearest adjacent overland tile. If it is a wilderness scouting event, pick one and go through it, then scout another tile so that you have an assault event (red sword icon).
- Perform the assault, and choose the event "Treasure map", which should be first or second on the list. If you don't see this event, check that you installed and enabled the mod.
- The comic panel has a dialog line which names the nearby tile, where the treasure map leads. You don't need to note it down, but observe that it is there. Finish the encounter.
- On the overland map, you should now see a purple flag, in the overland tile which was named by the comic panel. This tile is "usually" a scouted tile but not necessarily.
- If you click on the site icon (the hut in this case), rather than the overland tile background, you will also see a purple treasure map button, as shown here.
- Click the button or the flag, to get the popup where you assign participants to the job, as shown here.

- The progress bar on the flag should move quickly, and then the dialog "Treasure Map" should appear.
- Click through this encounter.


The key points of this are: a starting encounter which puts up the flag; the flag, button and dialog for the job; and the encounter itself.
The starting encounter
This section describes the key parts of the starting encounter, which puts up the flag. Using the in-game editor, open the comic davea_map_start. This is simple, but you can see the comic dialog reference to <otherSite.name>. Now open the effect. For a reason this author doesn't understand, this method currently only works for arriving at a hostile site, and does not work for either mission victory or wilderness scouting.
The first key part is the targets section, shown below. Target #3 defines the current site, which is generic. Target #6 controls the party members for the encounter, as described in earlier guides; you must have one named role in order for site selection to work, but you will presumably have several anyway. There are two magic parts: target #7, otherSite; and outcome #2, Aspects(otherSite). The magic happens because this target picks nearby site by some rules, and attaching the aspect causes the flag+button to appear on the site.

This shows the detail of the target (screenshot edited to remove uninteresting fields). We are picking one random site called otherSite, which must be of type SITE and must not be the current site. The canPath section uses one of your roles (target #6) to make sure that there is a path from this role to this site; this prevents selecting a site which is inaccessible due to impassible mountains or rivers. Make sure the role in canPath matches one of the roles in your target, otherwise this will silently fail.

Adding the aspect
The aspect is attached by the starting encounter to the otherSite. When the game attaches the aspect, it performs the effect listed in the aspect. In this case, that starts the "job" or treasure map encounter, which makes the flag and button appear. Make sure that the aspect name given in the encounter matches the name of the aspect, and make sure that the effect name given in the aspect matches the name of the encounter. If either of these pairs contain a typo or wrong name, the job will silently fail to trigger.

Adding the second encounter
Using the in-game editor, view the second encounter, davea_map_job. Unfortunately, this author considers most of this file to be "magic words" which work if used properly, but it is not clear which ones are required, or why. Because the encounter has so many fields, it is easier to show the json code. See Where to find installed mods to locate the file davea_map_job.json on your disk. These two targets appear to rely on hard coded names which are not explained anywhere this author can find. The promptText appears in the dialog where you select the party.
"targets": [
	{
		"template": "SELF_SITE_THIS_JOB_NOT_ACTIVE",
		"aspects": [ "THIS_JOB_NOT_ACTIVE", "SELF" ]
	},
	{
		"template": "JOB_PARTICIPANT",
		"promptText": "Who will search for the X on the map?",
		"slots": { "preFill": "noJobOrParty" }
	}
],
A few other details of the job are specified in the encounter, which are easier to explain. In the below screenshot of the job, the blurb is what appears in the overlap map tooltip when you hover over the flag. The longName is used for the text of the button. The icon ("magic") is used to select the icon that appears in the flag and the button. As of this writing, it is not possible for modders to add icons; but you can find existing icons and use one of them. The category ("research") is used to select the color of the flag and button. Research is purple, crafting is blue, and site is orange. I don't think modders can control the colors either but probably it is better to use these standard colors.

Putting it together
The best way to create your own encounter like this is to copy the two files for the encounter out of this mod and into your own. Then edit them, either using a text editor on the json, or with the in-game editor. Don't forget to create the aspect, and make sure all the names are matching. Then follow the instructions at the start of this guide to see your encounter in game.