Mod Injections
What Are Mod Injections?
For most content in Wildermyth, modding works by creating files at a parallel file structure to the main game within your mod folder, and the mod files either being added to or replacing existing files. (For example, mods/user/myCoolMod/assets/data/themes/wolf.json replacing the original assets/data/themes/wolf.json theme data)
However, sometimes we don't want to replace the whole file! Sometimes we just want to add or change a bit of data to an existing file. Take the "human" aspect, for example. If we want to give all humans a new ability, or change their base stats, we could do it by adding our own version of the assets/data/aspects/humans.json file. That's a pretty common thing that modders might want to do though, and if a player has multiple mods overriding that file, only the highest priority one will have an effect.
Mod Injection lets you make changes to existing json data without needing to overwrite the entire file. This allows multiple mods to edit the humans.json file without overriding each other. Or, if you want to make a change to a certain part of an existing campaign, now that can be done without needing to overwrite the entire campaign or make a separate campaign with that change.
Creating a Mod Injection
Open the Mod Injections page by navigating to Tools > Open Editor > Content and Comics Editor, and then switching from the "comics" page to the "mod injections" page via the dropdown.
Here you'll see two buttons at the top:
- Mod Injection Editor Mode: When Mod Injection Editor Mode is enabled, "Mod Injection" buttons will show up next to data lines that you can click to create new Mod Injections.
- Mod Injections: Editor setting: When enabled, Mod Injections will be applied across the editor and in-game. When disabled, they'll be ignored, showing the original files instead. (Note that this setting applies in-game as well, so don't forget to turn this back on if you want to test your Mod Injections!)
Click the Mod Injection Editor Mode button, and now Mod Injection buttons will show up for most lines of the editor!
An Example: Changing Human Stats
Let's say we want to adjust humans to be a bit less squishy by default, give them a bit more health. Switch over to the aspects tab and view the aforementioned "human" aspect. If you hover over the "HEALTH" stat line, you'll see a "Mod Injection" button.
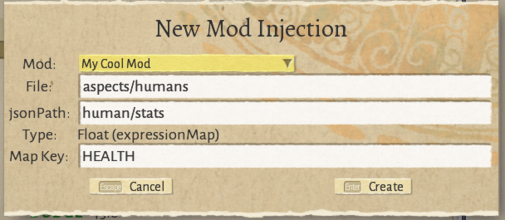
Click the Mod Injection button, and a New Mod Injection dialog will pop up. Usually, you shouldn't change anything in this dialog, just go ahead and click Create.
Immediately after clicking Create, you should see the mod injection you've just created. You'll note there's an "expression: 5" line. You can change that to whatever you'd like the health to be!
Save the Mod Injection file, and you're done! Mod Injection files are stored in a parallel file structure to the files they modify, in [yourModName]/assets/data/modInjections. For example, the file I just created is stored at mods/user/MyCoolMod/assets/data/modInjections/aspects/humans.json. For most Mod Injections, if you want to see the changes in context after creating one, you'll want to press the Refresh button in the top-right of the editor. This will cause all data and mods to reload, which will apply your mod injections to the data. (It will probably take a few seconds)


