Difference between revisions of "Modding encounter choice"
From Wildermyth Wiki
(Created page with "This page walks through the process of creating an encounter with a single choice. The focus is on getting something simple which you can see in the game, and adding more det...") |
|||
| Line 1: | Line 1: | ||
This page walks through the process of creating an encounter with a single choice. The focus is on getting something simple which you can see in the game, and adding more details later. The description and screenshots are current as of November 2019, early access version 0.10+98 Ryvio Wartmarch. | This page walks through the process of creating an encounter with a single choice. The focus is on getting something simple which you can see in the game, and adding more details later. The description and screenshots are current as of November 2019, early access version 0.10+98 Ryvio Wartmarch. | ||
== | ==Prerequisite encounter== | ||
# | # This is a brief summary of the prerequisite steps. If you have an example event already skip to the next section. For more details see [[Modding Wilderness encounter|Adding a wilderness encounter]] | ||
# Select "Tools" at the main game screen, then "Open Editor", then "Content and Comics Editor" | # Select "Tools" at the main game screen, then "Open Editor", then "Content and Comics Editor" | ||
# At the upper left, click "Mods", click "Create New Mod" in the browser, and fill in the form | # At the upper left, click "Mods", click "Create New Mod" in the browser, and fill in the form. | ||
# At the upper left, click "effects", then "New", and fill in the form. | # At the upper left, click "effects", then "New", and fill in the form. In the "Type" dropdown, select "Arrive at Hostile Site". The name field will fill in with auto-generated text. | ||
# On the targets line, add the default "hero" story role and a second story role "volunteer" | |||
# '''This is the most common mistake, causing a mod to not work! New events are disabled by default.''' Under abilities, set encounterEnabled to true | |||
# | |||
# '''This is the most common mistake, causing a mod to not work! | |||
== | ==Adding the choice in the effect== | ||
# | # Expand the choiceTarget line (click the plus sign to its left), hover over the options line, and click the "new target" button. In the "New Choice" dialog, you will see Choice Tag one, Outcome type simple. Leave these choices for now and just click "create". Create a second new choice, which will be filled in with Choice Tag two. Additional elements in the outcomes list are automatically added. The effect panel should look similar to this. | ||
[[File:ModdingChoiceEffect.PNG]] | |||
[[File: | |||
==Filling in the comic panels== | |||
==Seeing the effect in game== | ==Seeing the effect in game== | ||
<ol><li>If you haven't already done so, enable developer mode. (Save and exit before doing this.) In file explorer, create an empty file under steam\steamapps\common\Wildermyth called devmode.txt. | <ol><li>If you haven't already done so, enable developer mode. (Save and exit before doing this.) In file explorer, create an empty file under steam\steamapps\common\Wildermyth called devmode.txt. | ||
Revision as of 16:03, 1 December 2019
This page walks through the process of creating an encounter with a single choice. The focus is on getting something simple which you can see in the game, and adding more details later. The description and screenshots are current as of November 2019, early access version 0.10+98 Ryvio Wartmarch.
Prerequisite encounter
- This is a brief summary of the prerequisite steps. If you have an example event already skip to the next section. For more details see Adding a wilderness encounter
- Select "Tools" at the main game screen, then "Open Editor", then "Content and Comics Editor"
- At the upper left, click "Mods", click "Create New Mod" in the browser, and fill in the form.
- At the upper left, click "effects", then "New", and fill in the form. In the "Type" dropdown, select "Arrive at Hostile Site". The name field will fill in with auto-generated text.
- On the targets line, add the default "hero" story role and a second story role "volunteer"
- This is the most common mistake, causing a mod to not work! New events are disabled by default. Under abilities, set encounterEnabled to true
Adding the choice in the effect
- Expand the choiceTarget line (click the plus sign to its left), hover over the options line, and click the "new target" button. In the "New Choice" dialog, you will see Choice Tag one, Outcome type simple. Leave these choices for now and just click "create". Create a second new choice, which will be filled in with Choice Tag two. Additional elements in the outcomes list are automatically added. The effect panel should look similar to this.

Filling in the comic panels
Seeing the effect in game
- If you haven't already done so, enable developer mode. (Save and exit before doing this.) In file explorer, create an empty file under steam\steamapps\common\Wildermyth called devmode.txt.
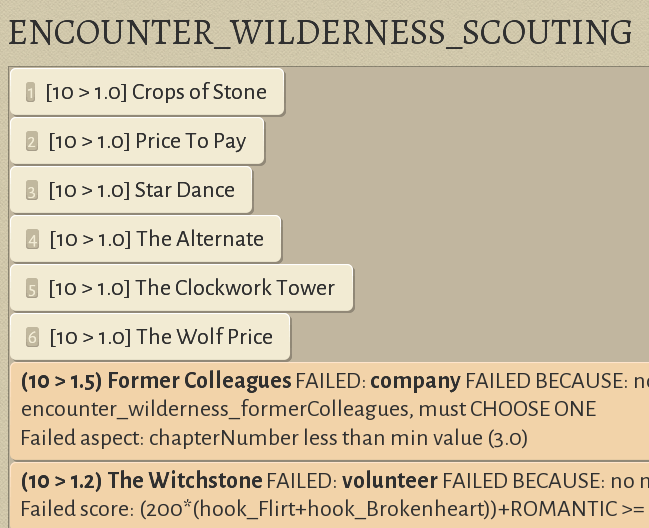
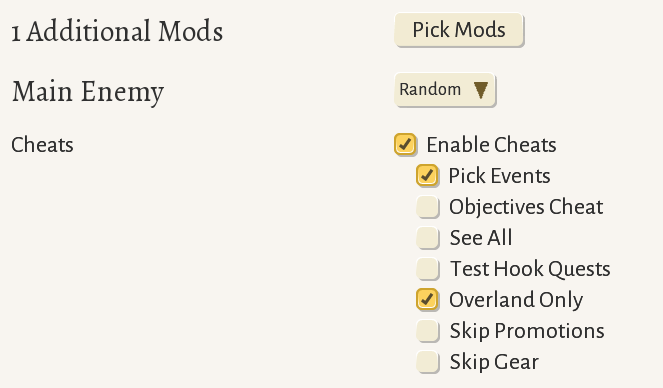
- Start a new one chapter story. Choose your mod in the mod picklist, enable "pick events" so that you can choose your event to trigger, and enable "overland only" to skip all the fights.
- When the game starts, you will get the first "pick event" dialog to choose which introductory story to use. Pick random and just click through it. Then choose any nearby territory and move your party to scout it. In order for a wilderness encounter to trigger, the territory must be empty; if you get an infestation result and the ambush icon appears, choose another territory and move to it. There doesn't appear to be any faster way to trigger an event.
- Once you complete a scouting event with no infestation, the "pick event" dialog will appear, showing your new event! In this case I have named it "Crops of Stone":