Difference between revisions of "Comic Editor Reference"
(→Comic Editor Basics: remove obsolete text panel stuff) |
(Added a lot of new information about new tools and features) |
||
| Line 1: | Line 1: | ||
This is a collection of reference material that explains how to use the Comic Editor to tell stories. | This is a collection of reference material that explains how to use the Comic Editor to tell stories. | ||
''(Related links: Check out the [[Writer's Guide]] for a more top-level view of crafting stories. If you're wondering about tags, check the [[Tag Reference]]. If you want your text to look a certain way, check [[Text Styles]])'' | ''(Related links: Check out the [[Writer's Guide]] for a more top-level view of crafting stories. If you're wondering about tags, check the [[Tag Reference]]. If you want your text to look a certain way, check [[Text Styles]]. If you want an overview of the overall structure of data in Wildermyth, look at the [[Data Format Overview]])'' | ||
==Who is this page for?== | |||
This page is for you if you want to make an event (comic) that will show up in Wildermyth, but aren't sure where to start. The editor for Wildermyth can do a lot (it's how we make all the events that are in the game!) but that also means it can have a pretty steep learning curve at times. This guide is meant to explain some of the basic structure, so that you can dive into making interesting stories without worrying too much about the more technical side of things. | |||
==Making a Mod== | |||
You'll want to be sure everything you create is in a separate mod folder, or else there's a chance an update to Wildermyth could wipe your custom events. Also, you'll be able to upload it to the Steam Workshop (or elsewhere) for others to play! | |||
* Open the Editor from the main menu (Tools > Editor), or open up [[Scratchpad]] directly | |||
* Go to the '''Content and Comics Editor'''. This is where most of the work on comics, events, and campaigns happens. | |||
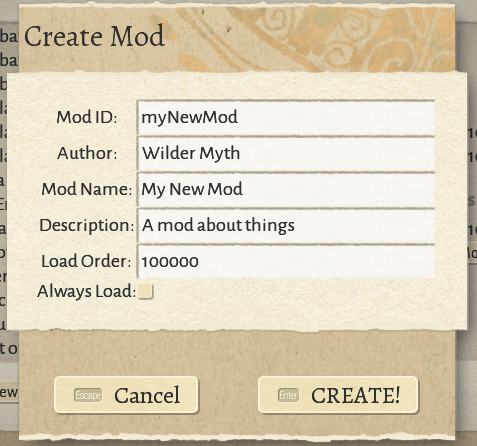
* Click the "Mods" button at the top-left, then click "Create New Mod". Create your mod, then click "CREATE!" and "Confirm". | |||
Your mod folder should open up in your file explorer when you click "CREATE!" If you're just making a basic story, you shouldn't need to interact with that folder directly, but that's where all the events you create will be stored. | |||
[[File:CreateModDialog.PNG]] | |||
==Make a New Event== | ==Make a New Event== | ||
* Click the '''New...''' Button or press Control+N | * Click the '''New...''' Button or press Control+N | ||
[[File:ComicEditorNewEvent.png]] | [[File:ComicEditorNewEvent.png]] | ||
* Select the [[Event Types|type of event]] you are creating, for example ''Arrive at Hostile Site'' or ''Mission Victory''. | * Make sure your mod is selected. | ||
* Enter your name if | * Select the [[Event Types|type of event]] you are creating, for example ''Arrive at Hostile Site'' or ''Mission Victory''. For this example, we'll make an Arrive at Hostile Site event with a player choice, since that's what a large percentage of Wildermyth's events are. | ||
* Enter | * Enter your name, if you want players to be able to see that you wrote this event. | ||
* Enter a name for the event. The tool will create an ID and Filename automatically. | |||
* Edit the id and filename if you want. | * Edit the id and filename if you want. | ||
* Press '''Create'''! | * Press '''Create'''! | ||
Congrats, you've created an event! | |||
===Story Roles=== | |||
Now that you have an event, it's time to add '''Targets''' for the important people, which is generally the heroes. A '''Target''' is simply a way to "target" an entity in the game that matches certain parameters. For example, if you wanted an event that had a bookish hero and their lover, you'd need to create a target for each of them, and then the event would only occur if it could find heroes with those characteristics. (You can read [[Story Inputs and Outputs]] for more information on some of this.) | |||
Looking on the left side, you'll see some existing targets, like self, company, overlandTile, site, party, and foes. These targets are automatically matched when the event happens, and are there in case you want to reference them or add other restrictions. (For example, you could click on overlandTile and edit it so that the event only happens when the overlandTile is a swamp biome) | |||
For now, skip over those targets, and click on the '''New Story Role''' button. You'll see that it creates a new "hero" target: | |||
[[File:EventTargets.PNG]] | |||
This new target means that this event will only happen if the party assaulting this site has at least one hero in it. Not very interesting yet, since ''all'' assaulting parties will have at least one hero. | |||
You '' | ====Roles==== | ||
You'll notice that "hero" is a dropdown. The word "hero" in this case is a '''Role'''. '''Roles''' are what we use to identify targets when placing them in comics or referring to them in dialogue. For example, "My name is <hero>" might show "My name is Martol" in-game. You can select from a wide variety of roles like warrior, bookish, leader, lover, target, and volunteer, but again, these are just ways to identify the target; the role itself doesn't impact who gets chosen for the target. | |||
=== | I want the main hero of this comic to be bookish, so I'm going to change their role from "hero" to "bookish". I'll leave the target as "required", but note that you can also have "optional" or "forbidden" targets. | ||
====Preferred/Required Personalities and Stats==== | |||
To define ''how'' to choose a hero for this target, press the '+' button on the right side of the target. This will create a dropdown underneath. This dropdown has a number of ways to match potential heroes by class, personality, aspects, or relationships with other heroes. Since I want a bookish hero, I'll select "personality". This causes another dropdown to appear, in which I can select "BOOKISH". | |||
Currently, this target will match the hero with the highest bookish stat, but if ''no'' heroes have a high bookish stat, I don't want the event to happen. If I click the checkbox at the start of the line, the game will require a hero with a bookish stat of at least 80. | |||
Notice that the "Score" underneath changes whenever you add another requirement or preference to a target. The dropdowns and checkboxes above are really just editing the '''scoreFunction''' and '''scoreThreshold''' values of the target, which you can see over on the right side of the comic editor. Many things can be accomplished with the dropdowns, but if you find that there's something they can't do, you can always edit the scoreFunction and scoreThreshold values directly. | |||
Continuing forward, I've created another New Story Role, given it the role "lover", and required that they're a lover with "bookish" | |||
[[File:EventTargetsBookishAndLover.PNG]] | |||
A few other notes: | A few other notes: | ||
* If a '''Required Role''' is not present, the story won't happen. This is usually what you want. This way you can be sure that if the story is being told at all, the right characters are in place. Sometimes you have a role that's not too important, and you can make it optional. | * If a '''Required Role''' is not present, the story won't happen. This is usually what you want. This way you can be sure that if the story is being told at all, the right characters are in place. Sometimes you have a role that's not too important, and you can make it optional. | ||
* ''' | * When you select a target, all the information about it shows up in the panel on the right side of the screen. That provides some more granular control over who gets matched for which targets. | ||
* Of particular note in that section is a field called '''Not Already Matched As''', which will auto-fill previous roles after your first target. This makes sure that this person isn't the same person you selected for a previous role, because then it might seem like they were arguing with themselves, which is only ''sometimes'' what you want. | |||
* Remember, targets are selected in order, and by the time you get to number three or four, it's unlikely that the Romantic is really an iconic romantic, so put your most important/iconic/identifiable roles first. | * Remember, targets are selected in order, and by the time you get to number three or four, it's unlikely that the Romantic is really an iconic romantic, so put your most important/iconic/identifiable roles first. | ||
Create as many roles as you need. Usually that means one per speaking role, and remember there are never more than 5 heroes in a party, but there can be more than that in the company. So, it depends what kind of story you're telling. | Create as many roles as you need. Usually that means one per speaking role, and remember there are never more than 5 heroes in a party, but there can be more than that in the company. So, it depends what kind of story you're telling. | ||
===Other Targets=== | ===Other Targets and NPCs=== | ||
In addition to Story Roles, you can create other targets. | In addition to Story Roles, you can create other targets. | ||
* The '''New NPC''' button will create an NPC that you can modify using the righthand panel. | |||
* The '''New Target''' button isn't particularly useful for comics in most cases, but there may be certain times when you want to target a weapon or a threat when this may come in useful. | |||
===Choices=== | ===Choices=== | ||
Some events call for choices. In this case, there's generally a prompt, which is a set of comic panels, and then a choice, which is several panels, some of which might only be present under certain circumstances. | Some events call for choices. In this case, there's generally a prompt, which is a set of comic panels, and then a choice, which is several panels, some of which might only be present under certain circumstances. To add a choice, click the '''New Choice''' button | ||
[[File:ComicEditorNewChoiceDialog1.png]] | |||
[[File:ComicEditorNewChoiceDialog1.png | |||
This lets you pick a tag (which is not too important except that the outcome will use the same tag). Then you can pick who will be speaking, and you can make the choice optional, so that if that character is not present, the choice won't show. Then you can choose if you want to add any branching, like a dice roll with a chance of multiple outcomes. Most commonly you will pick "simple" or "event roll." | This lets you pick a tag (which is not too important except that the outcome will use the same tag). Then you can pick who will be speaking, and you can make the choice optional, so that if that character is not present, the choice won't show. Then you can choose if you want to add any branching, like a dice roll with a chance of multiple outcomes. Most commonly you will pick "simple" or "event roll." | ||
You'll usually want to do this at least twice, so the player has two things to choose between. | |||
=== | ===Putting Targets in the Comic=== | ||
If you added Choices above, you'll notice that the roles you selected as "Who's on point" have already shown up in the "Choose" panel(s). But the choices don't mean much if there isn't a story preceding them, right? | |||
There are several ways to add targets to a panel. The first is by using the '''Compose Panel Dialog'''. You can get to this by clicking the '''Cmp''' button for existing panels, and you'll also see it every time you create a new panel using the '''Add Panel''' button: | |||
[[File:EventPromptTextEditor.PNG]] | |||
[[File:ComposePanel.PNG]] | |||
There are some options there to decide which roles you want to show in the panel, who you want to have speaking, whether there's narration, how to arrange the heroes, and more! You can't do anything ''too'' complex from here, but it's a good starting place. | |||
The other way to add targets to a panel is by clicking on the comic panel in the middle section (the left section works fine too) to select it, and then looking at '''actorSlots''' and '''textSlots'''. There are buttons to '''Add Actor''' and '''Add Text Box''', which is how you can add the targets you've made to that comic panel. In addition, there are buttons for '''Add Image''', '''Add Animation''', '''Narration''', '''Dark Box''', and '''Action Text''', which are individual objects that don't require any prior targeting. | |||
[[File:ActorSlotsAndTextSlots.PNG]] | |||
The little black boxes with '+' and '-' symbols can be used to expand/collapse more information about the actors and text. If you expand a target actor, you'll see that there are options for which role is being displayed, what direction they're facing, whether or not to show their weapons, their position, and more! Most of the time, you'll want to change position, rotation, and scale of actors and textboxes using the icons that appear around the images rather than adjusting the values manually. | |||
==Using Tags to Control Text== | ==Using Tags to Control Text== | ||
| Line 83: | Line 98: | ||
See : [[Tag Reference]] | See : [[Tag Reference]] | ||
As stated above, each event can specify a number of targets, which are often heroes, selected for a particular personality, relationship, etc.. These targets are assigned to [[Story Role|roles]]. Roles are easy-to-remember words like ''leader'', ''target'', ''hero'', ''hothead'', ''friend'', etc.. | |||
Once you have a target assigned to the role, you can insert the target into your text using a ''role tag'' like this. | Once you have a target assigned to the role, you can insert the target into your text using a ''role tag'' like this. | ||
| Line 98: | Line 113: | ||
/Ahem. Our foes appear to have arrived.></pre> | /Ahem. Our foes appear to have arrived.></pre> | ||
[[File:ComicEditor personalityTags.png]] | [[File:ComicEditor personalityTags.png]] | ||
When you type the opening '<' of a tag, a dropdown will appear showing you possible things you could put in. The most common inputs will be roles, like '''<bookish>''' and '''<lover>''', but there are other options too, like <DayOfMonth> to get what day it is, <season> to display the season, and <Company> to display the company name. | |||
[[File:TagAutocomplete.PNG]] | |||
If you enter a role alone, it will display the name of the hero matched to that target. However, if you put a period after the role (as demonstrated in some of the examples above), you can get more information about the hero. Those options will also be shown in a dropdown, and each option has a tooltip describing what it does. | |||
[[File:TagAutocompleteTooltip.PNG]] | |||
If you start using complex nested tags, you'll notice that the text display is colored in a context-sensitive way, so that you can see what blocks of text your cursor is within, and the text it will or may also show. (This text is one of the first lines of Age of Ulstryx. It's quite tame compared to later tag splits.) | |||
[[File:TextEditorContextSensitiveColoring.PNG]] | |||
The context bar at the bottom of the screen is also useful in complicated situations like this, to show what tags and splits are true at the point where your cursor is: | |||
[[File:TextEditorCursorTagBreadcrumbs.PNG]] | |||
Tags can do a lot more! For a full list of available tags see : [[Tag Reference]]. | Tags can do a lot more! For a full list of available tags see : [[Tag Reference]]. | ||
==Style Markup== | |||
See: [[Text Styles]] | See: [[Text Styles]] | ||
| Line 109: | Line 140: | ||
[bold]'''bold text''' [italic]'''''Bold italic text'''''[]'''bold again'''[] regular again. | [bold]'''bold text''' [italic]'''''Bold italic text'''''[]'''bold again'''[] regular again. | ||
You can set the size, color, and font of the text. See Main article on [[Text Styles]] for a full list of available fonts, styles, and colors. | You can set the size, color, and font of the text. See Main article on [[Text Styles]] for a full list of available fonts, styles, and colors. | ||
| Line 123: | Line 152: | ||
Sets the facial expression from text, overriding what the tool says. This is useful inside text splits, so you can tweak a panel without having to build a whole panel split. | Sets the facial expression from text, overriding what the tool says. This is useful inside text splits, so you can tweak a panel without having to build a whole panel split. | ||
=== | ===[[Outcomes]]=== | ||
TODO | TODO | ||
[[Category:Modding]] | [[Category:Modding]] | ||
[[Category:Modding Reference]] | [[Category:Modding Reference]] | ||
Revision as of 17:53, 19 January 2021
This is a collection of reference material that explains how to use the Comic Editor to tell stories.
(Related links: Check out the Writer's Guide for a more top-level view of crafting stories. If you're wondering about tags, check the Tag Reference. If you want your text to look a certain way, check Text Styles. If you want an overview of the overall structure of data in Wildermyth, look at the Data Format Overview)
Who is this page for?
This page is for you if you want to make an event (comic) that will show up in Wildermyth, but aren't sure where to start. The editor for Wildermyth can do a lot (it's how we make all the events that are in the game!) but that also means it can have a pretty steep learning curve at times. This guide is meant to explain some of the basic structure, so that you can dive into making interesting stories without worrying too much about the more technical side of things.
Making a Mod
You'll want to be sure everything you create is in a separate mod folder, or else there's a chance an update to Wildermyth could wipe your custom events. Also, you'll be able to upload it to the Steam Workshop (or elsewhere) for others to play!
- Open the Editor from the main menu (Tools > Editor), or open up Scratchpad directly
- Go to the Content and Comics Editor. This is where most of the work on comics, events, and campaigns happens.
- Click the "Mods" button at the top-left, then click "Create New Mod". Create your mod, then click "CREATE!" and "Confirm".
Your mod folder should open up in your file explorer when you click "CREATE!" If you're just making a basic story, you shouldn't need to interact with that folder directly, but that's where all the events you create will be stored.
Make a New Event
- Click the New... Button or press Control+N
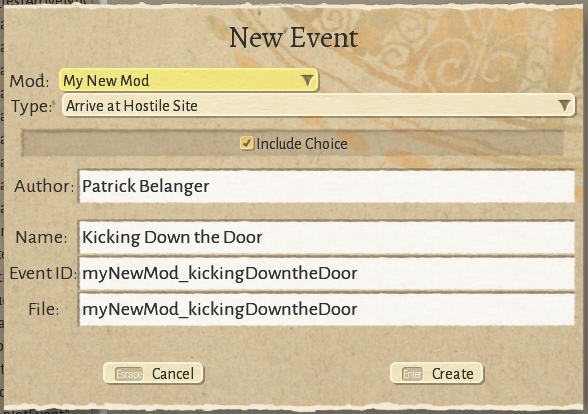
- Make sure your mod is selected.
- Select the type of event you are creating, for example Arrive at Hostile Site or Mission Victory. For this example, we'll make an Arrive at Hostile Site event with a player choice, since that's what a large percentage of Wildermyth's events are.
- Enter your name, if you want players to be able to see that you wrote this event.
- Enter a name for the event. The tool will create an ID and Filename automatically.
- Edit the id and filename if you want.
- Press Create!
Congrats, you've created an event!
Story Roles
Now that you have an event, it's time to add Targets for the important people, which is generally the heroes. A Target is simply a way to "target" an entity in the game that matches certain parameters. For example, if you wanted an event that had a bookish hero and their lover, you'd need to create a target for each of them, and then the event would only occur if it could find heroes with those characteristics. (You can read Story Inputs and Outputs for more information on some of this.)
Looking on the left side, you'll see some existing targets, like self, company, overlandTile, site, party, and foes. These targets are automatically matched when the event happens, and are there in case you want to reference them or add other restrictions. (For example, you could click on overlandTile and edit it so that the event only happens when the overlandTile is a swamp biome)
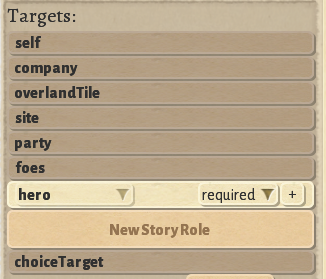
For now, skip over those targets, and click on the New Story Role button. You'll see that it creates a new "hero" target:
This new target means that this event will only happen if the party assaulting this site has at least one hero in it. Not very interesting yet, since all assaulting parties will have at least one hero.
Roles
You'll notice that "hero" is a dropdown. The word "hero" in this case is a Role. Roles are what we use to identify targets when placing them in comics or referring to them in dialogue. For example, "My name is <hero>" might show "My name is Martol" in-game. You can select from a wide variety of roles like warrior, bookish, leader, lover, target, and volunteer, but again, these are just ways to identify the target; the role itself doesn't impact who gets chosen for the target.
I want the main hero of this comic to be bookish, so I'm going to change their role from "hero" to "bookish". I'll leave the target as "required", but note that you can also have "optional" or "forbidden" targets.
Preferred/Required Personalities and Stats
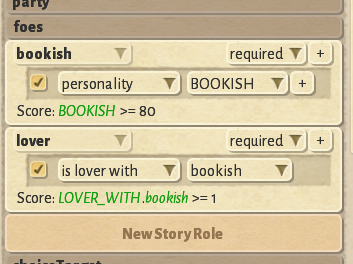
To define how to choose a hero for this target, press the '+' button on the right side of the target. This will create a dropdown underneath. This dropdown has a number of ways to match potential heroes by class, personality, aspects, or relationships with other heroes. Since I want a bookish hero, I'll select "personality". This causes another dropdown to appear, in which I can select "BOOKISH".
Currently, this target will match the hero with the highest bookish stat, but if no heroes have a high bookish stat, I don't want the event to happen. If I click the checkbox at the start of the line, the game will require a hero with a bookish stat of at least 80.
Notice that the "Score" underneath changes whenever you add another requirement or preference to a target. The dropdowns and checkboxes above are really just editing the scoreFunction and scoreThreshold values of the target, which you can see over on the right side of the comic editor. Many things can be accomplished with the dropdowns, but if you find that there's something they can't do, you can always edit the scoreFunction and scoreThreshold values directly.
Continuing forward, I've created another New Story Role, given it the role "lover", and required that they're a lover with "bookish"
A few other notes:
- If a Required Role is not present, the story won't happen. This is usually what you want. This way you can be sure that if the story is being told at all, the right characters are in place. Sometimes you have a role that's not too important, and you can make it optional.
- When you select a target, all the information about it shows up in the panel on the right side of the screen. That provides some more granular control over who gets matched for which targets.
- Of particular note in that section is a field called Not Already Matched As, which will auto-fill previous roles after your first target. This makes sure that this person isn't the same person you selected for a previous role, because then it might seem like they were arguing with themselves, which is only sometimes what you want.
- Remember, targets are selected in order, and by the time you get to number three or four, it's unlikely that the Romantic is really an iconic romantic, so put your most important/iconic/identifiable roles first.
Create as many roles as you need. Usually that means one per speaking role, and remember there are never more than 5 heroes in a party, but there can be more than that in the company. So, it depends what kind of story you're telling.
Other Targets and NPCs
In addition to Story Roles, you can create other targets.
- The New NPC button will create an NPC that you can modify using the righthand panel.
- The New Target button isn't particularly useful for comics in most cases, but there may be certain times when you want to target a weapon or a threat when this may come in useful.
Choices
Some events call for choices. In this case, there's generally a prompt, which is a set of comic panels, and then a choice, which is several panels, some of which might only be present under certain circumstances. To add a choice, click the New Choice button
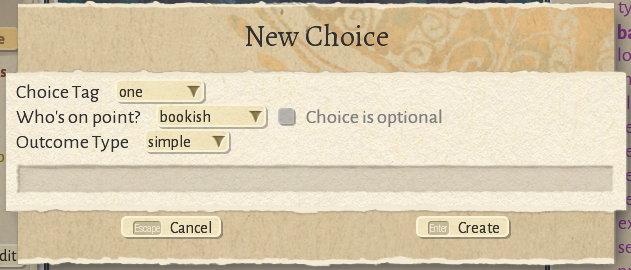
This lets you pick a tag (which is not too important except that the outcome will use the same tag). Then you can pick who will be speaking, and you can make the choice optional, so that if that character is not present, the choice won't show. Then you can choose if you want to add any branching, like a dice roll with a chance of multiple outcomes. Most commonly you will pick "simple" or "event roll."
You'll usually want to do this at least twice, so the player has two things to choose between.
Putting Targets in the Comic
If you added Choices above, you'll notice that the roles you selected as "Who's on point" have already shown up in the "Choose" panel(s). But the choices don't mean much if there isn't a story preceding them, right?
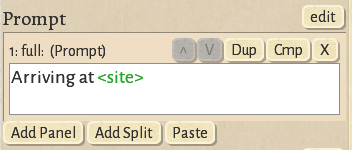
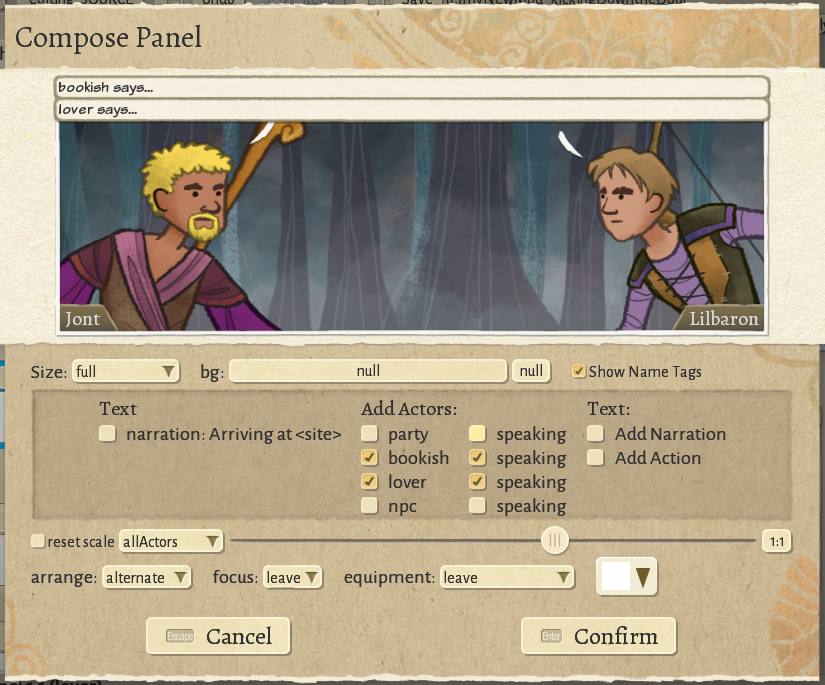
There are several ways to add targets to a panel. The first is by using the Compose Panel Dialog. You can get to this by clicking the Cmp button for existing panels, and you'll also see it every time you create a new panel using the Add Panel button:
There are some options there to decide which roles you want to show in the panel, who you want to have speaking, whether there's narration, how to arrange the heroes, and more! You can't do anything too complex from here, but it's a good starting place.
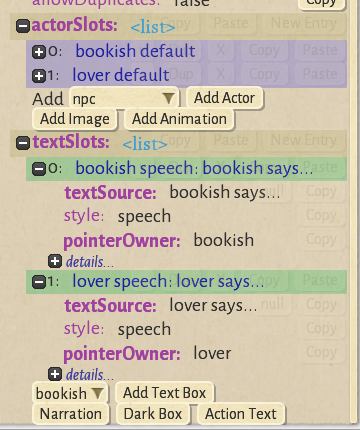
The other way to add targets to a panel is by clicking on the comic panel in the middle section (the left section works fine too) to select it, and then looking at actorSlots and textSlots. There are buttons to Add Actor and Add Text Box, which is how you can add the targets you've made to that comic panel. In addition, there are buttons for Add Image, Add Animation, Narration, Dark Box, and Action Text, which are individual objects that don't require any prior targeting.
The little black boxes with '+' and '-' symbols can be used to expand/collapse more information about the actors and text. If you expand a target actor, you'll see that there are options for which role is being displayed, what direction they're facing, whether or not to show their weapons, their position, and more! Most of the time, you'll want to change position, rotation, and scale of actors and textboxes using the icons that appear around the images rather than adjusting the values manually.
Using Tags to Control Text
See : Tag Reference
As stated above, each event can specify a number of targets, which are often heroes, selected for a particular personality, relationship, etc.. These targets are assigned to roles. Roles are easy-to-remember words like leader, target, hero, hothead, friend, etc..
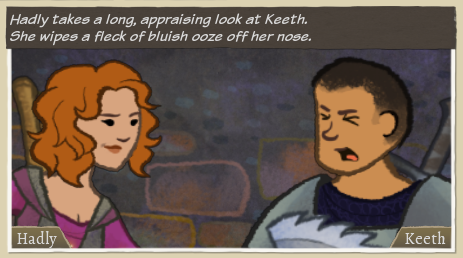
Once you have a target assigned to the role, you can insert the target into your text using a role tag like this.
<leader> takes a long, appraising look at <hothead>.
<leader.mf:He/She> wipes a fleck of bluish ooze off <leader.mf:his/her> nose.
This is a simple example but we can get a lot more sophisticated, and tags can be nested as well. The status bar at the bottom will tell you where the cursor is within a tag or nested tag. It's super handy for complex splits!
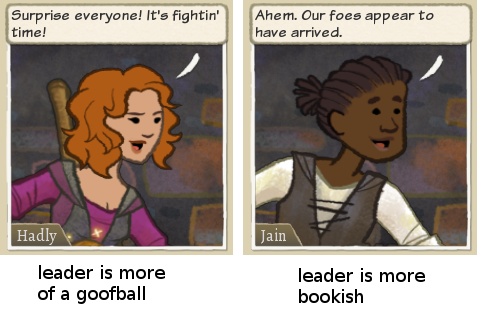
One of the key uses of tags is to give heroes different lines depending on their personalities. This works by embedding the stats you care about in the tag.
<leader.goofball/bookish:
Surprise everyone! It's fightin' time!
/Ahem. Our foes appear to have arrived.>
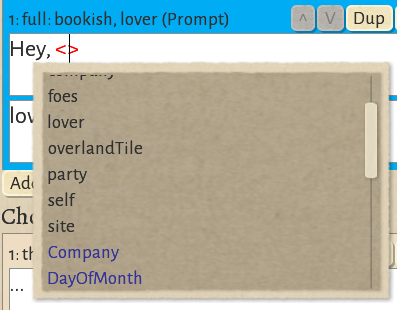
When you type the opening '<' of a tag, a dropdown will appear showing you possible things you could put in. The most common inputs will be roles, like <bookish> and <lover>, but there are other options too, like <DayOfMonth> to get what day it is, <season> to display the season, and <Company> to display the company name.
If you enter a role alone, it will display the name of the hero matched to that target. However, if you put a period after the role (as demonstrated in some of the examples above), you can get more information about the hero. Those options will also be shown in a dropdown, and each option has a tooltip describing what it does.
If you start using complex nested tags, you'll notice that the text display is colored in a context-sensitive way, so that you can see what blocks of text your cursor is within, and the text it will or may also show. (This text is one of the first lines of Age of Ulstryx. It's quite tame compared to later tag splits.)
The context bar at the bottom of the screen is also useful in complicated situations like this, to show what tags and splits are true at the point where your cursor is:
Tags can do a lot more! For a full list of available tags see : Tag Reference.
Style Markup
See: Text Styles
Text in a comic panel gets a style automatically depending on if the TextBox is set up as narration, speech, thought, etc.. The Style can be modified using square brackets. Generally, text-style markup is similar to html markup, in that you have a starting and ending tag, BUT! our style format doesn't require the end tag to have anything in it.
It looks like this:
[bold]bold text [italic]Bold italic text[]bold again[] regular again.
You can set the size, color, and font of the text. See Main article on Text Styles for a full list of available fonts, styles, and colors.
Tweaking Faces
See: Face Tags
 [face:sad]
 [hero.face:dubious]
 [loner.face:talking]
Sets the facial expression from text, overriding what the tool says. This is useful inside text splits, so you can tweak a panel without having to build a whole panel split.
Outcomes
TODO
